孙振的博客

Record my life , my study , my think


  • 首页

  • 标签

  • 时间线

HTM5标签语义化

发表于 2017-04-07

html语义化标签

1
2
3
4
5
6
7
8
9
10
11
12
13
14
<a>标签:实现超链接
<p>标签:文章段落放到<p>标签中
<hx>标签:文章标题,栏目标题用<hx>表示
标题标签一共有6个, h1、h2、h3、h4、h5、h6 分别为一级标题、二级标题、三级标题、四级标题、五级标题、六级标题。并且依据重要性递减。 <h1> 是最高的等级。
<strong>和<em>标签:特别强调某几个文字
但两者在强调的语气上有区别:<em> 表示强调,<strong> 表示更强烈的强调。并且在浏览器中<em> 默认用 斜体 表示,<strong> 用 粗体 表示。
<q>标签:短文本引用
<blockquote>标签:长文本引用
注意浏览器对 < blockquote>标签的解析是 缩进样式
<address>标签:为网页加入地址信息
<ul>标签:无序列表
<ol>标签:有序列表
<caption>标签:为表格添加标题和摘要
摘要的内容是不会在浏览器中显示出来的。它的作用是增加表格的可读性(语义化),使搜索引擎更好的读懂表格内容,还可以使屏幕阅读器更好的帮助特殊用户读取表格内容。

html5语义化标签

1
2
3
4
5
6
7
8
9
10
11
12
13
14
15
16
17
18
19
20
21
1. article标签:装载显示一个独立的文章内容。
例如一篇完整的论坛帖子,一则网站新闻,一篇博客文章等等,一个用户评论等等 artilce可以嵌套,则内层的artilce对外层的article标签有隶属的关系。
2. section 标签:定义文档中的节(section、区段)。比如章节、页眉、页脚或文档中的其他部分。
3. aside 标签: 用来装载非正文类的内容。例如广告,成组的链接,侧边栏等等。
4. hgroup 标签:用于对网页或区段的标题元素(h1-h6)进行组合。
例如,在一个区段中你有连续的h系列的标签元素,则可以用hgroup将他们括起来。
<hgroup>
<h1>标题1</h1>
<h2>标题2</h2>
</hgroup>
5. header 标签:定义文档的页面组合,通常是一些引导和导航信息。
6. footer 标签:定义 section 或 document 的页脚。
7. nav 标签:导航链接放在nav标签里。
nav标签里应该放入一些当前页面的主要导航链接。
例如在页脚显示一个站点的导航链接(如首页,服务信息页面,版权信息页面等等),就可以使用nav标签,当然,这不是必须的。
8. time 标签:定义公历的时间(24 小时制)或日期,时间和时区偏移是可选的。
该元素能够以机器可读的方式对日期和时间进行编码,搜索引擎也能够生成更智能的搜索结果
9. mark 标签:定义带有记号的文本。请在需要突出显示文本时使用 <mark> 标签。
10. figure标签:规定独立的流内容(图像、图表、照片、代码等等)。
11. figcaption 标签:定义 figure 元素的标题(caption)。
"figcaption" 元素应该被置于 "figure" 元素的第一个或最后一个子元素的位置。

javascript继承详解

发表于 2017-04-06

上一篇javascript继承的简单实现一文中已经介绍了继承,但那篇只能算简介。本篇结合原型链详细介绍一下JavaScript的继承。

通常除非小应用,那像JavaScript继承一文中那样直接写写代码就行了。如果是大型应用或者库函数,对于继承这种稍显复杂的代码结构,通常会封装成一个inherit函数。例如:

1
2
3
4
5
6
7
8
9
function Parent(n) { //父构造函数
this.name = n || 'Adam';
}
Parent.prototype.say = function() {
return this.name;
}
function Child(n) {} //空白的子构造函数
inherit(Child, Parent); //继承

现在我们来实现inherit。

模式一 : 默认模式,将原型对象指向父对象

1
2
3
function inherit(Child, Parent) {
Child.prototype = new Parent(); //原型对象指向父对象
}

例子:

1
2
3
4
5
6
7
8
9
10
11
12
13
14
15
16
17
function Parent(n) { //父构造函数
this.name = n || 'Adam';
}
Parent.prototype.say = function() {
return this.name;
}
function Child(n) {} //空白的子构造函数
function inherit(Child, Parent) {
Child.prototype = new Parent(); //原型对象指向父对象
}
inherit(Child, Parent); //继承
var c1 = new Child("Jack");
console.log(c1.name); //Adam
c1.say(); //Adam

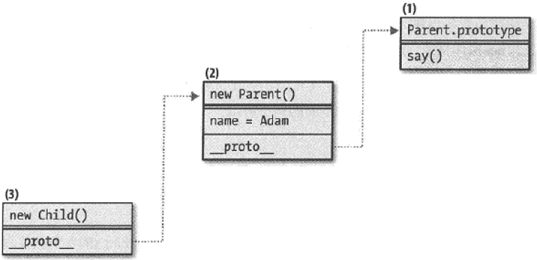
原型链图:

见上面的结果为Adam。这就是该模式的缺点之一,即无法将子构造函数的参数给父构造函数。这个缺点很致命,因此通常我们不用该模式。即使你能保证父子构造函数都不需要参数,那从结果上看是OK的,但效率是低下的,例如你再创建一个子对象:

1
2
var c2 = new Child("Betty");
console.log(c2.name); //Adam

模式二 : 借用构造函数
该方法解决了模式一中无法通过子构造函数传递参数给父构造函数的问题:

1
2
3
function Child(a, b, c, d) { //子构造函数
Parent.apply(this, arguments); //借用父构造函数
}

例子

1
2
3
4
5
6
7
8
9
10
11
12
13
14
function Parent(n) { //父构造函数
this.name = n || 'Adam';
}
Parent.prototype.say = function() {
return this.name;
}
function Child(n) { //子构造函数
Parent.apply(this, arguments); //借用父构造函数
}
var c2 = new Child("Patrick");
console.log(c2.name); //Patrick
c2.say(); //error,未定义

结果看出Child的参数顺利传入了,但say方法会报未定义的错。原因就是该模式并没有将prototype指向Parent,只不过借用了一下Parent的实现。因此看似是继承,其实不然,从原型链角度来看,两者毫无关系。Child的实例对象里自然就没有Parent原型中的say方法。图示如下:
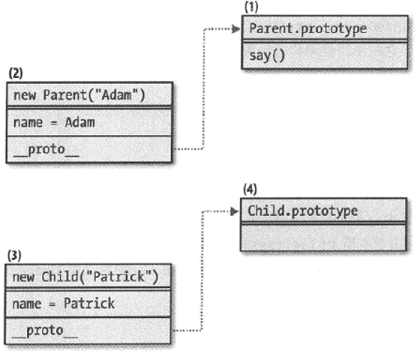
总结一下该模式:子类只是借用了父类构造函数的实现,从结果上看,获得了一个父对象的副本。但子类对象和父类对象是完全独立的,不存在修改子类对象的属性值影响父对象的风险。缺点是该模式某种意义上讲,其实不是继承,无法从父类的prototype中获得任何东西
模式三 : 借用和设置原型
本模式是上面两个模式的结合体,借鉴了上面两种模式的特点:

1
2
3
4
function Child(a, b, c, d) { //子构造函数
Parent.apply(this, arguments); //参照模式二,借用父构造函数
}
Child.prototype = new Parent(); //参照模式一,将原型对象指向父对象

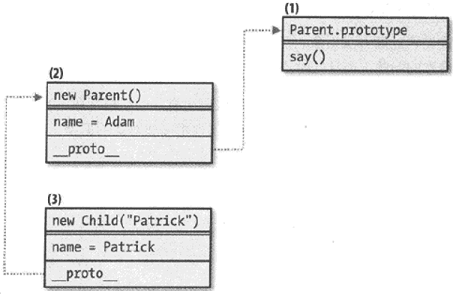
这就是javascript继承的简单实现一文中推荐的继承模式。子对象既可获得父对象本身的成员副本,又能获得原型的引用。子对象能传参数给父构造函数,也能安全地修改自身属性。
例子:
1
2
3
4
5
6
7
8
9
10
11
12
13
14
15
16
17
function Parent(n) { //父构造函数
this.name = n || 'Adam';
}
Parent.prototype.say = function() {
return this.name;
}
function Child(name) { //子构造函数
Parent.apply(this, arguments);
}
Child.prototype = new Parent();
var c4 = new Child("Patrick");
console.log(c4.name); //Patrick
console.log(c4.say()); //Patrick
delete c4.name;
console.log(c4.say()); //Adam

该模式通常用用就可以了,但不是完美的。缺点和模式二的缺点二一样,多个子对象都会重复地创建父对象,效率不高。另外从例子的结果和图中都可以看出,有两个name属性,一个在父对象中,一个在子对象中。你delete子对象中的name后,父对象的name会显现出来,这可能会出bug。而且对效率狂来说,冗余的属性会看着不舒服。

模式四 : 借用和设置原型
为了克服模式三需要重复创建父对象的缺点,该模式不调用构造函数,即任何需要继承的成员都放到原型里,而不是放置在父构造函数的this中。等价于对象共享一个原型

1
2
3
function inherit(Child, Parent) {
Child.prototype = Parent.prototype;
}

例子:

1
2
3
4
5
6
7
8
9
10
11
12
13
14
15
16
17
18
19
20
21
function Parent(n) { //父构造函数
this.name = n || 'Adam';
}
Parent.prototype.say = function() {
return this.name;
}
function Child(n) {
this.name = n;
}
function inherit(Child, Parent) {
Child.prototype = Parent.prototype;
}
inherit(Child, Parent); //继承
var c4 = new Child("Patrick");
console.log(c4.name); //Patrick
console.log(c4.say()); //Patrick
delete c4.name;
console.log(c4.say()); //undefined

从结果可以看出,该模式和模式三不同,现在你delete子对象的name属性,就不会将父对象的name属性显现出来了。原型链图:

该模式除了需要你仔细斟酌哪些属性和方法需要被继承,抽出来放到父类原型里。而且由于父子对象共享原型,因此双方修改时都要小心,如果子对象不小心修改了原型里的属性和方法,会影响到父对象,反之亦然。例如:

1
2
3
4
5
6
7
8
9
10
11
Child.prototype.setName = function(n) {
return this.name = n;
}
c4.setName("Jack");
console.log(c4.name); //Jack
console.log(c4.say()); //Jack
var c5 = new Parent();
c5.setName("Betty");
console.log(c5.name); //Betty
console.log(c5.say()); //Betty

给子类原型增加一个setName方法。由于父子类共享原型,因此父类对象也自动获得了setName方法。

模式五 : 临时构造函数
为解决模式四中父子对象间耦合度较高的缺点,该模式断开父子对象间的原型的直接链接关系,但同时还能继续受益于原型链的好处

1
2
3
4
5
function inherit(Child, Parent) {
var F = function() {}; //空的临时构造函数
F.prototype = Parent.prototype;
Child.prototype = new F();
}

例子:

1
2
3
4
5
6
7
8
9
10
11
12
13
14
15
16
17
18
19
20
21
22
23
function Parent(n) { //父构造函数
this.name = n || 'Adam';
}
Parent.prototype.say = function() {
return this.name;
}
function Child(n) {
this.name = n;
}
function inherit(Child, Parent) {
var F = function() {};
F.prototype = Parent.prototype;
Child.prototype = new F();
}
inherit(Child, Parent); //继承
var c6 = new Child("Patrick");
console.log(c6.name); //Patrick
console.log(c6.say()); //Patrick
delete c6.name;
console.log(c6.say()); //undefined

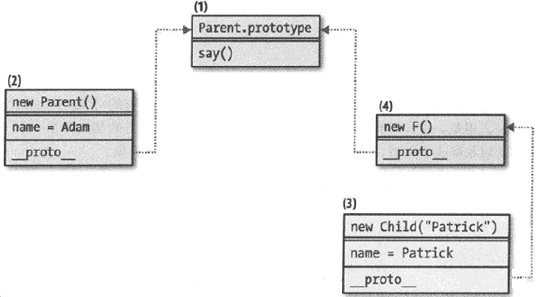
原型链图:

与模式四的差别就是,新定义了个空的临时构造函数F(),子类的原型指向该临时构造函数。这样修改子类原型时,实际修改的是修改到了临时构造函数F(),不会影响父类:

1
2
3
4
5
6
7
8
9
Child.prototype.setName = function(n) {
return this.name = n;
}
c6.setName("Jack");
console.log(c6.name); //Jack
console.log(c6.say()); //Jack
var c7 = new Parent();
c7.setName("Betty"); //error,未定义

上面的例子和模式四中相同,但结果不同,子类原型上添加的新方法setName,父类对象无法访问。
该模式非常好,即有效率,还能实现父子解耦。本着精益求精的精神,再为该模式增加三个加分项:

加分项一 添加一个指向父类原型的引用,例如其他语言里的super:

1
2
3
4
5
6
function inherit(Child, Parent) {
var F = function() {}; //空的临时构造函数
F.prototype = Parent.prototype;
Child.prototype = new F();
Child.uber = Parent.prototype; //uber表示super,因为super是保留的关键字
}

这样如果你为子类原型添加setName方法后,希望父类对象也能获得该方法,可以:

1
2
3
4
5
6
7
8
9
10
11
12
13
14
15
16
17
18
19
20
21
22
23
24
25
26
27
28
29
function inherit(Child, Parent) {
var F = function() {}; //空的临时构造函数
F.prototype = Parent.prototype;
Child.prototype = new F();
Child.uber = Parent.prototype; //uber表示super,因为super是保留的关键字
}
inherit(Child, Parent); //继承
Child.prototype.setName1 = function(n) {
return this.name = n;
}
Child.uber.setName2 = function(n) {
return this.name = n;
}
var c8 = new Child("Patrick");
c8.setName1("Jack");
console.log(c8.name); //Jack
console.log(c8.say()); //Jack
c8.setName2("Betty");
console.log(c8.name); //Betty
console.log(c8.say()); //Betty
var c9 = new Parent();
c9.setName1("Andy"); //error,未定义
c9.setName2("Andy");
console.log(c9.name); //Andy
console.log(c9.say()); //Andy

子类给原型的新增方法setName1不会影响父类,父类对象无法使用setName1。但父类对象可以使用子类通过uber给原型的新增方法setName2。

加分项二 重置该构造函数的指针,以免在将来某个时候还需要该构造函数。如果不重置构造函数的指针,那么所有子对象会报告Parent()是它们的构造函数,这没有任何用处:

1
2
3
var c10 = new Child();
console.log(c10.constructor.name); //Parent
console.log(c10.constructor === Parent); //true

虽然我们很少用constructor属性,不改也不影响实际的使用,但作为完美主义者还是改一下吧:

1
2
3
4
5
6
7
8
9
10
11
12
13
function inherit(Child, Parent) {
var F = function() {}; //空的临时构造函数
F.prototype = Parent.prototype;
Child.prototype = new F();
Child.uber = Parent.prototype; //uber表示super,因为super是保留的关键字
Child.prototype.constructor = Child; //修正constructor属性
}
inherit(Child, Parent); //继承
var c11 = new Child();
console.log(c11.constructor.name); //Child
console.log(c11.constructor === Parent); //false

加分项三 临时构造函数F()不必每次继承时都创建,仅创建一次以提高效率:

1
2
3
4
5
6
7
8
9
var inherit = (function() {
var F = function() {};
return function(Child, Parent) {
F.prototype = Parent.prototype;
Child.prototype = new F();
Child.uber = Parent.prototype;
Child.prototype.constructor = Child;
}
}());

javascript继承的简单实现

发表于 2017-04-06

JavaScript作为一门语法比较松散的语言,在ES6之前并没有像C++/Java等传统OO语言一样有class关键字,也不能通过private,public等关键字来限定权限。本篇就介绍一下JavaScript是如何实现继承的。

JavaScript的继承可以分为两类:

  • 基于对象的继承
  • 基于类型的继承

基于对象的继承

基于对象的继承也叫原型继承。我们知道通过JavaScript字面量创建的对象都会连接到 Object.prototype ,因此我们用Object.prototype来实现继承。本质上是摒弃类,不调用构造函数,而是用Object.create(),直接让新对象继承旧对象的属性。例如:

1
2
3
4
5
6
var person = {
name: "Jack",
getName: function () { return this.name; }
}
var p1 = Object.create(person);
console.log(p1.getName()); //Jack

代码很简单,person有一个属性和一个方法。对象p1通过Object.create()来继承,第一个参数prototype指向person的prototype,这样对象p1就继承了person的属性和方法。

Object.create()还可以指定第二个参数,即数据属性,将其添加到新对象中。数据属性可设4个描述符value, writable,enumerable,configurable 。后3个看名字也能猜出意思,不指定的话默认为false。因为和本篇关系不大,就不跑题了,只看看设置value的情况:

1
2
3
4
5
6
var p2 = Object.create(person, {
name: {
value: "Zhang"
}
});
console.log(p2.getName()); //Zhang

用Object.create()相当于创建了一个全新的对象,你可以给该对象任意新增,重载它的属性和方法:

1
2
3
4
5
6
7
8
9
10
11
12
13
14
15
var person = {
name: "Jack",
getName: function () { return this.name; },
getAge: function() { return this.age; } //注意并没有age这个成员变量,依赖子类实现
}
var p3 = Object.create(person);
p3.name = 'Rose';
p3.age = 17;
p3.location = '上海';
p3.getLocation = function() { return this.location; }
console.log(p3.getName()); //Rose
console.log(p3.getAge()); //17
console.log(p3.getLocation()); //上海

在person中并没有age这个属性,因此你调用person.getAge();将得到undefined。但在对象p3里新定义了age这个属性,于是就能正确地调用基类的getAge方法。另外子类重载了name的值,且新定义了location属性和getLocation方法。结果如上所示,不赘述。

基于类型的继承

基于类型的继承是通过构造函数依赖于原型的继承,而非依赖于对象。例如:

1
2
3
4
5
6
7
8
9
10
11
12
13
14
15
16
17
function Person(name) {
this.name = name;
this.getName = function () { return this.name; };
}
function Student(name, age) {
Person.call(this, name);
this.age = age;
this.getAge = function () { return this.age; };
}
Student.prototype = new Person(); //需要通过new来访问基类的构造函数
var p = new Person('Cathy');
var s = new Student('Bill', 23);
console.log(p.getName()); //Cathy
console.log(s.getName()); //Bill
console.log(s.getAge()); //23

Student继承自Person。name虽然是在基类Person里被定义的,但用new调用Person的构造函数后,this将被绑定到子类Student对象上,因此name最终是定义在子类Student对象上的。结果如上所示,不赘述。

保护隐私

之所以定义getName,getAge等方法就是不想让用户直接访问name,age等属性。可惜上面两种继承均无法保护隐私,均可像p.name,p.age这样直接访问属性。如果认为这些属性的隐私非常重要,希望模拟出OO语言中private属性的效果,可以用函数模块化。

所谓函数模块化,本质上就是在函数内新建一个对象,新对象的方法里使用参数对象的属性,然后将新对象返回。此时新对象里是没有参数对象的属性的,达到了保护隐私的目的。代码如下:

1
2
3
4
5
6
7
8
9
10
11
12
13
var person = function(spec) {
var that = {}; //新对象
that.getName = function () { return spec.name; }; //使用参数的属性
that.getAge = function() { return spec.age; }; //使用参数的属性
return that; //返回新对象
}
var p4 = person({name: 'Jane', age: 20});
console.log(p4.name); //undefined
console.log(p4.age); //undefined
console.log(p4.getName()); //Jane
console.log(p4.getAge()); //20

进一步实现多层继承也非常方便,效果如下,不赘述:

1
2
3
4
5
6
7
8
9
10
11
12
13
14
15
var student = function(spec) {
var that = person(spec); //新对象继承自person
that.getRole = function() { return 'student'; }; //新对象增加方法
that.getInfo = function() {
return spec.name + ' ' + spec.age + ' ' + that.getRole();
};
return that; //返回新对象
};
var p5 = student({name:'Andy', age:12});
console.log(p5.name); //undefined
console.log(p5.getName()); //Andy
console.log(p5.getRole()); //student
console.log(p5.getInfo()); //Andy 12 student

123
sunzhen

sunzhen


github主页

23 日志
10 标签
© 2017 sunzhen
由 Hexo 强力驱动
主题 - NexT.Pisces