javascript继承详解

上一篇javascript继承的简单实现一文中已经介绍了继承,但那篇只能算简介。本篇结合原型链详细介绍一下JavaScript的继承。

通常除非小应用,那像JavaScript继承一文中那样直接写写代码就行了。如果是大型应用或者库函数,对于继承这种稍显复杂的代码结构,通常会封装成一个inherit函数。例如:

1
2
3
4
5
6
7
8
9
function Parent(n) { //父构造函数
this.name = n || 'Adam';
}
Parent.prototype.say = function() {
return this.name;
}
function Child(n) {} //空白的子构造函数
inherit(Child, Parent); //继承

现在我们来实现inherit。

模式一 : 默认模式,将原型对象指向父对象

1
2
3
function inherit(Child, Parent) {
Child.prototype = new Parent(); //原型对象指向父对象
}

例子:

1
2
3
4
5
6
7
8
9
10
11
12
13
14
15
16
17
function Parent(n) { //父构造函数
this.name = n || 'Adam';
}
Parent.prototype.say = function() {
return this.name;
}
function Child(n) {} //空白的子构造函数
function inherit(Child, Parent) {
Child.prototype = new Parent(); //原型对象指向父对象
}
inherit(Child, Parent); //继承
var c1 = new Child("Jack");
console.log(c1.name); //Adam
c1.say(); //Adam

原型链图:

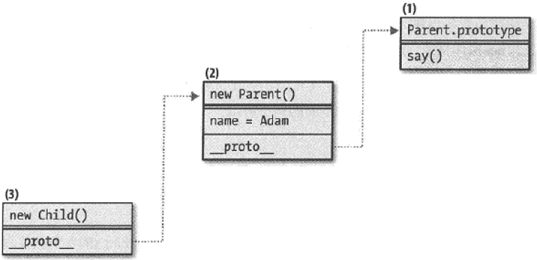
见上面的结果为Adam。这就是该模式的缺点之一,即无法将子构造函数的参数给父构造函数。这个缺点很致命,因此通常我们不用该模式。即使你能保证父子构造函数都不需要参数,那从结果上看是OK的,但效率是低下的,例如你再创建一个子对象:

1
2
var c2 = new Child("Betty");
console.log(c2.name); //Adam

模式二 : 借用构造函数
该方法解决了模式一中无法通过子构造函数传递参数给父构造函数的问题:

1
2
3
function Child(a, b, c, d) { //子构造函数
Parent.apply(this, arguments); //借用父构造函数
}

例子

1
2
3
4
5
6
7
8
9
10
11
12
13
14
function Parent(n) { //父构造函数
this.name = n || 'Adam';
}
Parent.prototype.say = function() {
return this.name;
}
function Child(n) { //子构造函数
Parent.apply(this, arguments); //借用父构造函数
}
var c2 = new Child("Patrick");
console.log(c2.name); //Patrick
c2.say(); //error,未定义

结果看出Child的参数顺利传入了,但say方法会报未定义的错。原因就是该模式并没有将prototype指向Parent,只不过借用了一下Parent的实现。因此看似是继承,其实不然,从原型链角度来看,两者毫无关系。Child的实例对象里自然就没有Parent原型中的say方法。图示如下:

总结一下该模式:子类只是借用了父类构造函数的实现,从结果上看,获得了一个父对象的副本。但子类对象和父类对象是完全独立的,不存在修改子类对象的属性值影响父对象的风险。缺点是该模式某种意义上讲,其实不是继承,无法从父类的prototype中获得任何东西
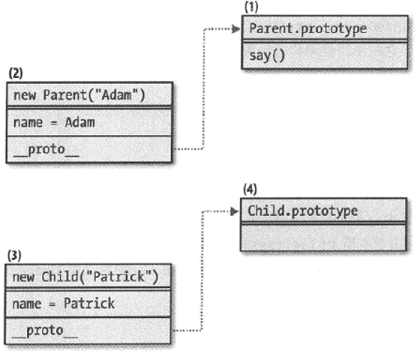
模式三 : 借用和设置原型
本模式是上面两个模式的结合体,借鉴了上面两种模式的特点:

1
2
3
4
function Child(a, b, c, d) { //子构造函数
Parent.apply(this, arguments); //参照模式二,借用父构造函数
}
Child.prototype = new Parent(); //参照模式一,将原型对象指向父对象

这就是javascript继承的简单实现一文中推荐的继承模式。子对象既可获得父对象本身的成员副本,又能获得原型的引用。子对象能传参数给父构造函数,也能安全地修改自身属性。
例子:

1
2
3
4
5
6
7
8
9
10
11
12
13
14
15
16
17
function Parent(n) { //父构造函数
this.name = n || 'Adam';
}
Parent.prototype.say = function() {
return this.name;
}
function Child(name) { //子构造函数
Parent.apply(this, arguments);
}
Child.prototype = new Parent();
var c4 = new Child("Patrick");
console.log(c4.name); //Patrick
console.log(c4.say()); //Patrick
delete c4.name;
console.log(c4.say()); //Adam

该模式通常用用就可以了,但不是完美的。缺点和模式二的缺点二一样,多个子对象都会重复地创建父对象,效率不高。另外从例子的结果和图中都可以看出,有两个name属性,一个在父对象中,一个在子对象中。你delete子对象中的name后,父对象的name会显现出来,这可能会出bug。而且对效率狂来说,冗余的属性会看着不舒服。
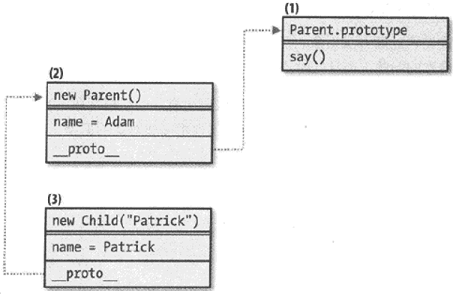
模式四 : 借用和设置原型
为了克服模式三需要重复创建父对象的缺点,该模式不调用构造函数,即任何需要继承的成员都放到原型里,而不是放置在父构造函数的this中。等价于对象共享一个原型

1
2
3
function inherit(Child, Parent) {
Child.prototype = Parent.prototype;
}

例子:

1
2
3
4
5
6
7
8
9
10
11
12
13
14
15
16
17
18
19
20
21
function Parent(n) { //父构造函数
this.name = n || 'Adam';
}
Parent.prototype.say = function() {
return this.name;
}
function Child(n) {
this.name = n;
}
function inherit(Child, Parent) {
Child.prototype = Parent.prototype;
}
inherit(Child, Parent); //继承
var c4 = new Child("Patrick");
console.log(c4.name); //Patrick
console.log(c4.say()); //Patrick
delete c4.name;
console.log(c4.say()); //undefined

从结果可以看出,该模式和模式三不同,现在你delete子对象的name属性,就不会将父对象的name属性显现出来了。原型链图:

该模式除了需要你仔细斟酌哪些属性和方法需要被继承,抽出来放到父类原型里。而且由于父子对象共享原型,因此双方修改时都要小心,如果子对象不小心修改了原型里的属性和方法,会影响到父对象,反之亦然。例如:

1
2
3
4
5
6
7
8
9
10
11
Child.prototype.setName = function(n) {
return this.name = n;
}
c4.setName("Jack");
console.log(c4.name); //Jack
console.log(c4.say()); //Jack
var c5 = new Parent();
c5.setName("Betty");
console.log(c5.name); //Betty
console.log(c5.say()); //Betty

给子类原型增加一个setName方法。由于父子类共享原型,因此父类对象也自动获得了setName方法。
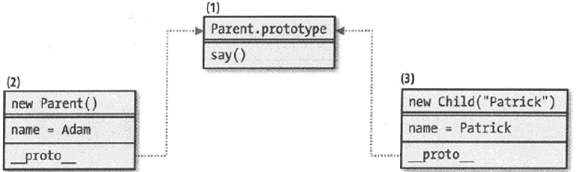
模式五 : 临时构造函数
为解决模式四中父子对象间耦合度较高的缺点,该模式断开父子对象间的原型的直接链接关系,但同时还能继续受益于原型链的好处

1
2
3
4
5
function inherit(Child, Parent) {
var F = function() {}; //空的临时构造函数
F.prototype = Parent.prototype;
Child.prototype = new F();
}

例子:

1
2
3
4
5
6
7
8
9
10
11
12
13
14
15
16
17
18
19
20
21
22
23
function Parent(n) { //父构造函数
this.name = n || 'Adam';
}
Parent.prototype.say = function() {
return this.name;
}
function Child(n) {
this.name = n;
}
function inherit(Child, Parent) {
var F = function() {};
F.prototype = Parent.prototype;
Child.prototype = new F();
}
inherit(Child, Parent); //继承
var c6 = new Child("Patrick");
console.log(c6.name); //Patrick
console.log(c6.say()); //Patrick
delete c6.name;
console.log(c6.say()); //undefined

原型链图:

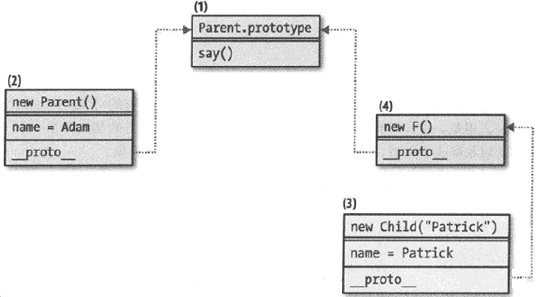
与模式四的差别就是,新定义了个空的临时构造函数F(),子类的原型指向该临时构造函数。这样修改子类原型时,实际修改的是修改到了临时构造函数F(),不会影响父类:

1
2
3
4
5
6
7
8
9
Child.prototype.setName = function(n) {
return this.name = n;
}
c6.setName("Jack");
console.log(c6.name); //Jack
console.log(c6.say()); //Jack
var c7 = new Parent();
c7.setName("Betty"); //error,未定义

上面的例子和模式四中相同,但结果不同,子类原型上添加的新方法setName,父类对象无法访问。
该模式非常好,即有效率,还能实现父子解耦。本着精益求精的精神,再为该模式增加三个加分项:

加分项一 添加一个指向父类原型的引用,例如其他语言里的super:

1
2
3
4
5
6
function inherit(Child, Parent) {
var F = function() {}; //空的临时构造函数
F.prototype = Parent.prototype;
Child.prototype = new F();
Child.uber = Parent.prototype; //uber表示super,因为super是保留的关键字
}

这样如果你为子类原型添加setName方法后,希望父类对象也能获得该方法,可以:

1
2
3
4
5
6
7
8
9
10
11
12
13
14
15
16
17
18
19
20
21
22
23
24
25
26
27
28
29
function inherit(Child, Parent) {
var F = function() {}; //空的临时构造函数
F.prototype = Parent.prototype;
Child.prototype = new F();
Child.uber = Parent.prototype; //uber表示super,因为super是保留的关键字
}
inherit(Child, Parent); //继承
Child.prototype.setName1 = function(n) {
return this.name = n;
}
Child.uber.setName2 = function(n) {
return this.name = n;
}
var c8 = new Child("Patrick");
c8.setName1("Jack");
console.log(c8.name); //Jack
console.log(c8.say()); //Jack
c8.setName2("Betty");
console.log(c8.name); //Betty
console.log(c8.say()); //Betty
var c9 = new Parent();
c9.setName1("Andy"); //error,未定义
c9.setName2("Andy");
console.log(c9.name); //Andy
console.log(c9.say()); //Andy

子类给原型的新增方法setName1不会影响父类,父类对象无法使用setName1。但父类对象可以使用子类通过uber给原型的新增方法setName2。

加分项二 重置该构造函数的指针,以免在将来某个时候还需要该构造函数。如果不重置构造函数的指针,那么所有子对象会报告Parent()是它们的构造函数,这没有任何用处:

1
2
3
var c10 = new Child();
console.log(c10.constructor.name); //Parent
console.log(c10.constructor === Parent); //true

虽然我们很少用constructor属性,不改也不影响实际的使用,但作为完美主义者还是改一下吧:

1
2
3
4
5
6
7
8
9
10
11
12
13
function inherit(Child, Parent) {
var F = function() {}; //空的临时构造函数
F.prototype = Parent.prototype;
Child.prototype = new F();
Child.uber = Parent.prototype; //uber表示super,因为super是保留的关键字
Child.prototype.constructor = Child; //修正constructor属性
}
inherit(Child, Parent); //继承
var c11 = new Child();
console.log(c11.constructor.name); //Child
console.log(c11.constructor === Parent); //false

加分项三 临时构造函数F()不必每次继承时都创建,仅创建一次以提高效率:

1
2
3
4
5
6
7
8
9
var inherit = (function() {
var F = function() {};
return function(Child, Parent) {
F.prototype = Parent.prototype;
Child.prototype = new F();
Child.uber = Parent.prototype;
Child.prototype.constructor = Child;
}
}());